DIY Natural Face Masks for Glowing Skin

Imagine walking into your kitchen and finding everything needed for a luxurious spa treatment that costs less than five dollars. DIY Natural Face Masks for Glowing Skin have revolutionized home skincare routines, offering women and health enthusiasts an affordable, chemical-free path to radiant skin. These homemade treatments harness the power of everyday ingredients to deliver professional-quality results right from the comfort of home.
Key Takeaways
• Natural ingredients like honey, avocado, and oatmeal provide powerful skin benefits without harsh chemicals
• Cost-effective skincare – most DIY masks cost under $3 per treatment compared to $50+ professional facials
• Customizable formulas allow targeting specific skin concerns like dryness, acne, or dullness
• Fresh preparation ensures maximum potency and eliminates preservative concerns
• Immediate results often visible after just one application, with cumulative benefits over time
Why Choose Natural Face Masks Over Store-Bought Options? 🌿
The beauty industry generates over $500 billion annually, yet many commercial products contain synthetic ingredients that can irritate sensitive skin. DIY Natural Face Masks for Glowing Skin offer a refreshing alternative that puts control back in your hands.
Benefits of Going Natural
Cost Savings: Commercial face masks range from $15-75 per treatment, while homemade versions typically cost $2-5. Over a year, this translates to savings of hundreds of dollars.
Ingredient Transparency: Every component is visible and controllable. No mysterious chemicals, parabens, or sulfates hiding in fine print.
Freshness Factor: Unlike store-bought masks that may sit on shelves for months, homemade versions are prepared fresh, ensuring maximum potency.
Customization Power: Skin needs change with seasons, hormones, and age. Natural masks can be adjusted instantly to address current concerns.
“The best skincare routine is one that works with your skin’s natural processes, not against them.” – Dr. Sarah Chen, Dermatologist
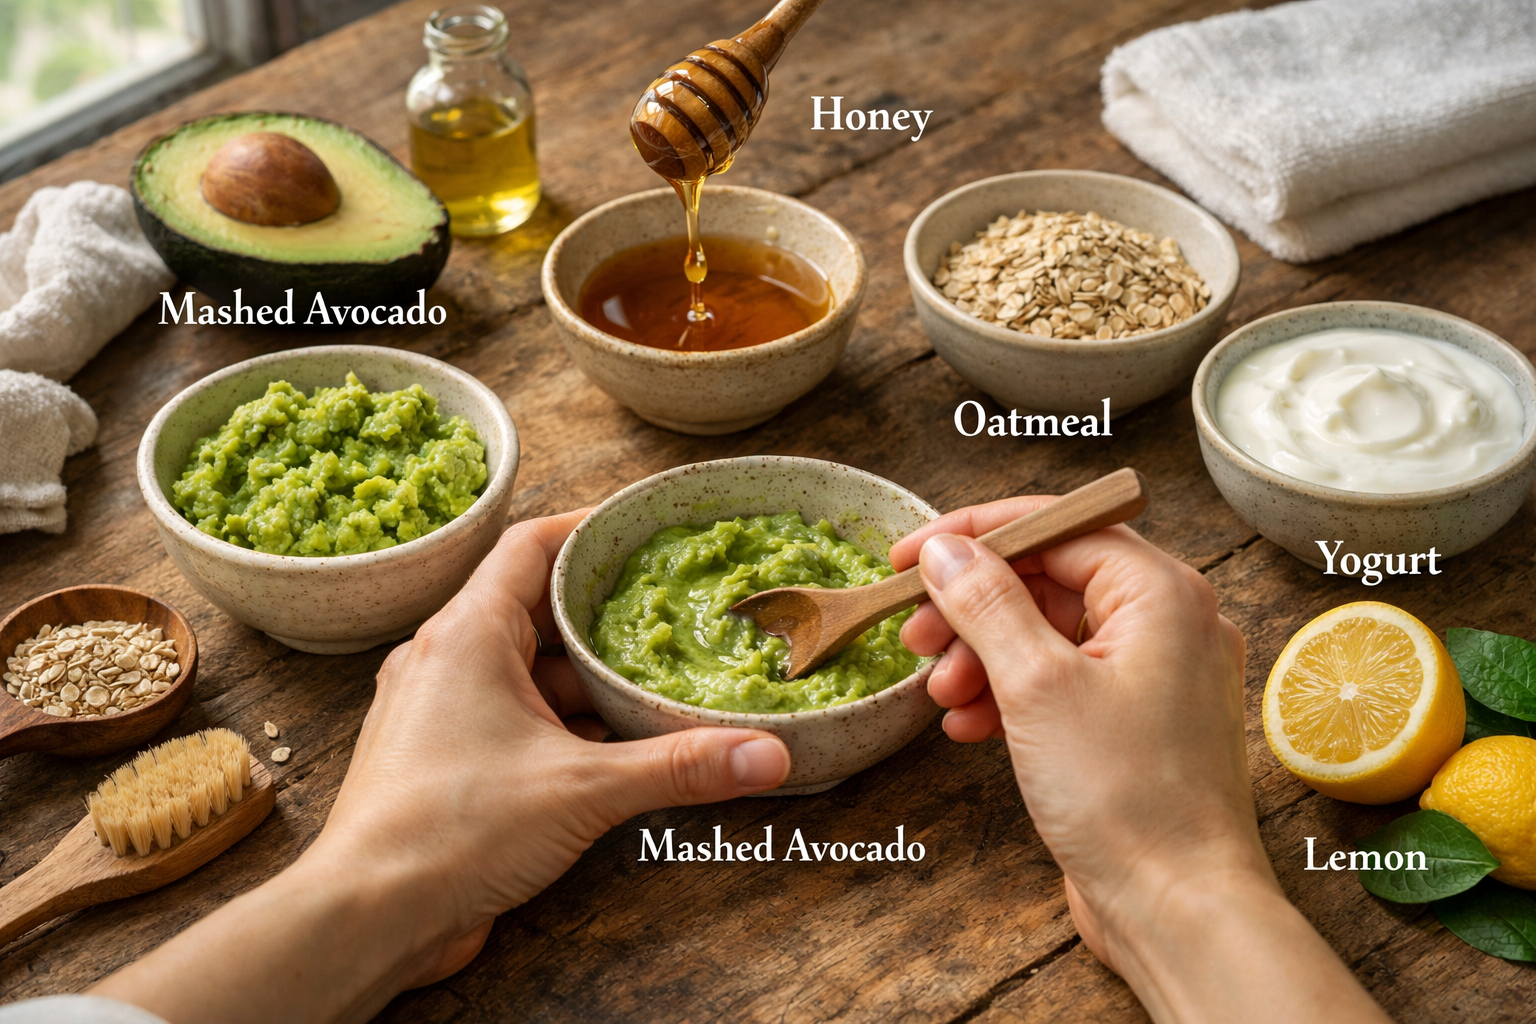
Essential Ingredients for DIY Natural Face Masks for Glowing Skin 🥑
Understanding which ingredients deliver specific benefits helps create targeted treatments for individual skin needs.
Hydrating Powerhouses
Honey 🍯
- Contains natural humectants that draw moisture into skin
- Antimicrobial properties fight acne-causing bacteria
- Gentle enough for sensitive skin types
- Best varieties: Raw, unprocessed Manuka honey
Avocado 🥑
- Rich in vitamins E and K for skin repair
- Natural oils provide deep moisturization
- Omega-3 fatty acids reduce inflammation
- Perfect for dry or mature skin
Greek Yogurt 🥛
- Lactic acid provides gentle exfoliation
- Probiotics support skin barrier function
- Protein content promotes skin elasticity
- Ideal for combination skin types
Purifying Champions
Bentonite Clay 🏺
- Draws impurities from deep within pores
- Reduces excess oil production
- Mineral-rich formula nourishes skin
- Excellent for oily or acne-prone skin
Oatmeal 🌾
- Natural saponins cleanse gently
- Beta-glucan soothes irritated skin
- Mild exfoliation removes dead cells
- Perfect for sensitive or inflamed skin
Brightening Boosters
Turmeric ✨
- Curcumin reduces dark spots and hyperpigmentation
- Anti-inflammatory properties calm redness
- Antioxidants protect against environmental damage
- Use sparingly to avoid temporary yellow tint
Lemon Juice 🍋
- Vitamin C brightens dull complexions
- Natural alpha hydroxy acids promote cell turnover
- Astringent properties tighten pores
- Always dilute and use evening only
Top 10 DIY Natural Face Masks for Glowing Skin Recipes 💫
1. Honey Oat Glow Mask (All Skin Types)
Ingredients:
- 2 tablespoons raw honey
- 1 tablespoon finely ground oats
- 1 teaspoon warm water
Instructions:
- Mix ingredients until smooth paste forms
- Apply to clean face, avoiding eye area
- Leave for 15-20 minutes
- Rinse with lukewarm water while gently massaging
- Pat dry and apply moisturizer
Benefits: Hydrates while gently exfoliating, leaving skin soft and radiant.
2. Avocado Yogurt Hydration Mask (Dry Skin)
Ingredients:
- 1/2 ripe avocado, mashed
- 2 tablespoons plain Greek yogurt
- 1 teaspoon honey
Instructions:
- Blend ingredients until creamy
- Apply thick layer to face and neck
- Relax for 20 minutes
- Remove with damp cloth
- Follow with gentle moisturizer
Benefits: Deeply moisturizes and nourishes dehydrated skin.
3. Clay Detox Mask (Oily/Acne-Prone Skin)
Ingredients:
- 1 tablespoon bentonite clay
- 1 tablespoon apple cider vinegar
- 1 teaspoon water (if needed)
Instructions:
- Mix clay with vinegar until smooth
- Add water if consistency too thick
- Apply to clean skin, avoiding sensitive areas
- Leave until almost dry (10-15 minutes)
- Rinse thoroughly with cool water
Benefits: Draws out impurities and reduces excess oil production.
4. Turmeric Brightening Mask (Dull/Uneven Skin)
Ingredients:
- 1 teaspoon turmeric powder
- 2 tablespoons plain yogurt
- 1 teaspoon honey
Instructions:
- Combine ingredients in non-metal bowl
- Apply evenly to face
- Leave for 10-15 minutes maximum
- Rinse with lukewarm water
- Use gentle cleanser if yellow tint remains
Benefits: Brightens complexion and evens skin tone naturally.
5. Banana Anti-Aging Mask (Mature Skin)
Ingredients:
- 1 ripe banana, mashed
- 1 tablespoon heavy cream
- 1 teaspoon vitamin E oil
Instructions:
- Mash banana until completely smooth
- Mix in cream and vitamin E oil
- Apply to face and neck
- Leave for 20-25 minutes
- Remove with warm washcloth
Benefits: Provides anti-aging nutrients and deep hydration.
6. Cucumber Cooling Mask (Sensitive/Irritated Skin)
Ingredients:
- 1/2 cucumber, peeled and blended
- 1 tablespoon aloe vera gel
- 1 teaspoon rose water
Instructions:
- Blend cucumber until smooth
- Strain to remove pulp if desired
- Mix with aloe vera and rose water
- Apply to clean face
- Leave for 15-20 minutes, rinse gently
Benefits: Soothes inflammation and reduces redness.
7. Coffee Energizing Mask (Tired/Dull Skin)
Ingredients:
- 2 tablespoons finely ground coffee
- 1 tablespoon coconut oil, melted
- 1 tablespoon honey
Instructions:
- Mix coffee grounds with warm coconut oil
- Add honey and stir well
- Apply to face with gentle circular motions
- Leave for 10-15 minutes
- Rinse while massaging for exfoliation
Benefits: Stimulates circulation and provides antioxidant protection.
8. Strawberry Vitamin C Mask (Brightening)
Ingredients:
- 3 fresh strawberries, mashed
- 1 tablespoon plain yogurt
- 1 teaspoon honey
Instructions:
- Mash strawberries thoroughly
- Mix with yogurt and honey
- Apply to clean face
- Leave for 15 minutes
- Rinse with cool water
Benefits: Delivers vitamin C for brightening and gentle exfoliation.
9. Egg White Tightening Mask (Sagging Skin)
Ingredients:
- 1 egg white
- 1 teaspoon lemon juice
- 1 teaspoon honey
Instructions:
- Whisk egg white until frothy
- Add lemon juice and honey
- Apply thin layer to face
- Leave until tight and dry (15-20 minutes)
- Rinse with lukewarm water
Benefits: Temporarily tightens skin and minimizes pore appearance.
10. Green Tea Antioxidant Mask (Environmental Protection)
Ingredients:
- 2 green tea bags, contents only
- 2 tablespoons plain yogurt
- 1 teaspoon honey
Instructions:
- Empty tea bags and mix with yogurt
- Add honey and blend well
- Apply to face and neck
- Leave for 20 minutes
- Rinse thoroughly
Benefits: Provides powerful antioxidants and anti-inflammatory compounds.
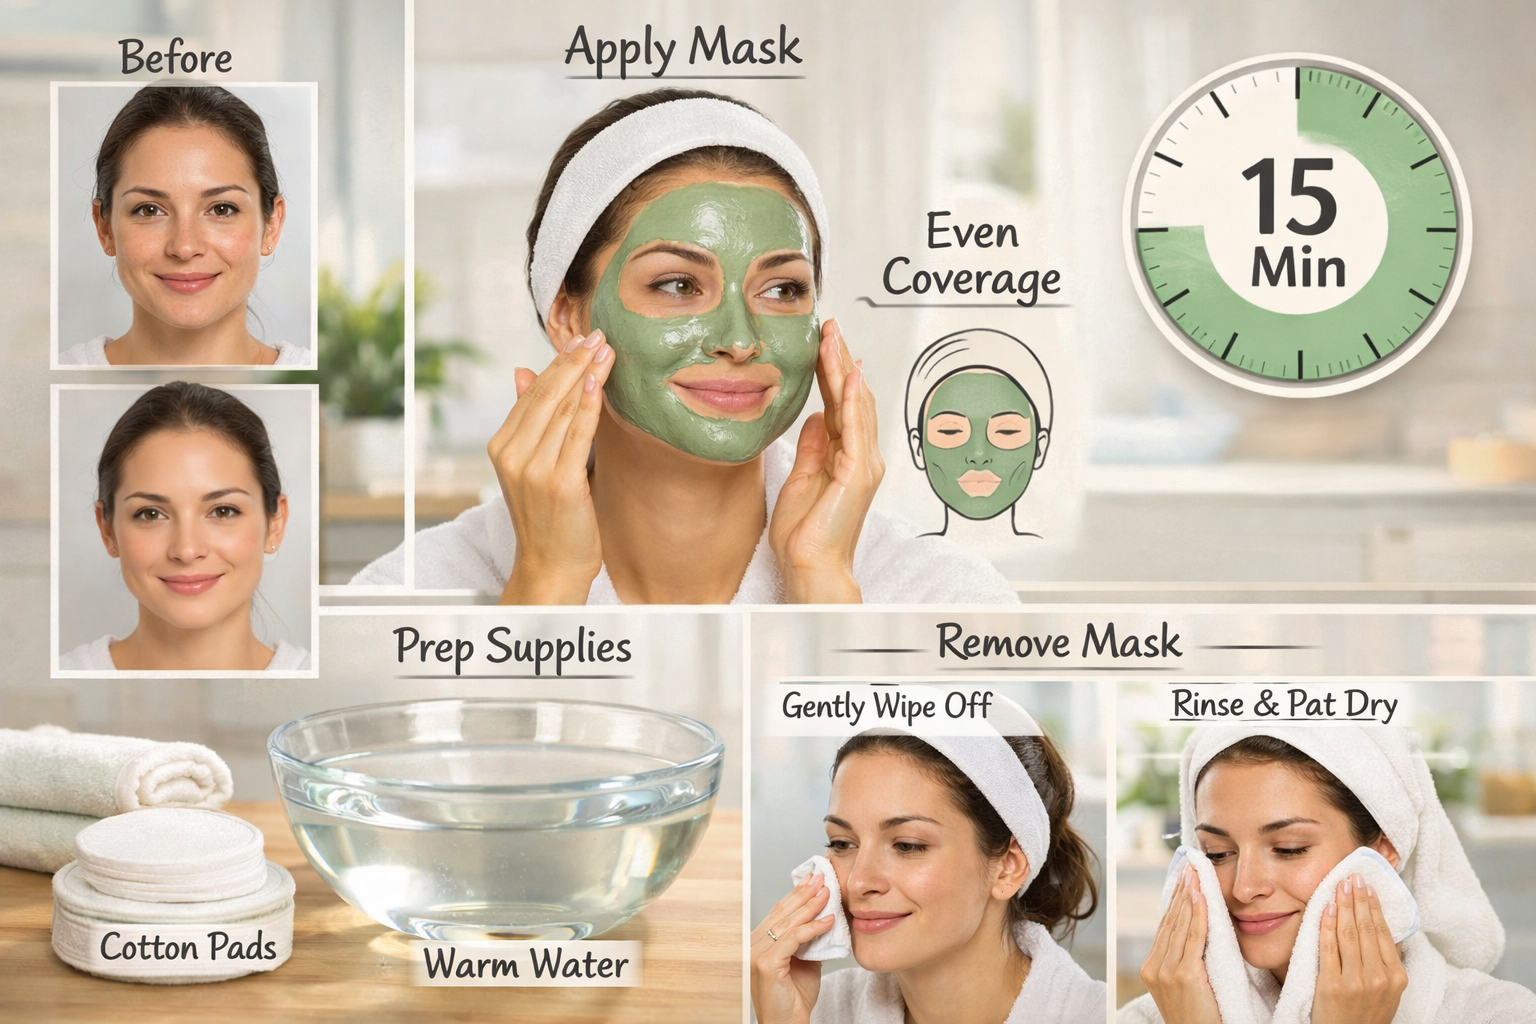
Application Techniques for Maximum Results from DIY Natural Face Masks for Glowing Skin 🎯
Pre-Application Preparation
Skin Cleansing: Always start with clean skin. Use a gentle cleanser to remove makeup, dirt, and oil. This ensures maximum absorption of beneficial ingredients.
Steam Treatment (Optional): Hold face over bowl of hot water for 2-3 minutes. This opens pores and enhances ingredient penetration.
Patch Testing: Test new ingredients on inner wrist 24 hours before facial application. This prevents adverse reactions on facial skin.
Application Best Practices
| Step | Technique | Duration |
|---|---|---|
| Cleanse | Gentle circular motions | 1-2 minutes |
| Steam | 6-8 inches from hot water | 2-3 minutes |
| Apply | Upward strokes, avoid eyes | 3-5 minutes |
| Relax | Lie down, face up | 15-25 minutes |
| Remove | Lukewarm water, soft cloth | 2-3 minutes |
Professional Application Tips
Even Coverage: Use clean fingers or soft brush to apply masks evenly. Avoid tugging or pulling skin.
Timing Matters: Never exceed recommended time limits. Over-exposure can cause irritation or dryness.
Removal Technique: Use lukewarm water and gentle circular motions. Pat skin dry rather than rubbing.
Post-Mask Care: Apply toner and moisturizer while skin is still slightly damp to lock in hydration.
Customizing Your DIY Natural Face Masks for Glowing Skin Routine 📅
Frequency Guidelines by Skin Type
Normal Skin: 1-2 masks per week
- Alternate between hydrating and gentle exfoliating masks
- Focus on maintenance and prevention
Dry Skin: 2-3 masks per week
- Emphasize hydrating and nourishing ingredients
- Avoid clay-based masks which can be too drying
Oily Skin: 2-3 masks per week
- Include clay or charcoal masks for deep cleansing
- Balance with hydrating masks to prevent over-drying
Combination Skin: 2 masks per week
- Use different masks on T-zone versus cheeks
- Multi-masking approach for targeted treatment
Sensitive Skin: 1 mask per week maximum
- Stick to gentle, soothing ingredients
- Always patch test new formulations
Seasonal Adjustments
Winter Routine ❄️
- Focus on hydrating and nourishing masks
- Add ingredients like honey, avocado, and oils
- Increase frequency to combat dry indoor air
Summer Routine ☀️
- Emphasize cooling and oil-controlling masks
- Include cucumber, clay, and astringent ingredients
- May need to reduce frequency in humid climates
Transition Seasons 🍂🌸
- Gradually adjust mask types and frequency
- Pay attention to how skin responds to weather changes
- Incorporate gentle exfoliation to manage seasonal skin changes
Safety Considerations and Common Mistakes to Avoid ⚠️
Ingredient Safety Guidelines
Citrus Precautions: Lemon and lime juices can cause photosensitivity. Always use in evening routines and apply SPF the following day.
Essential Oil Dilution: Never apply essential oils directly to skin. Always dilute in carrier oils or other base ingredients.
Allergy Awareness: Common allergens include nuts, dairy, and certain fruits. Know personal sensitivities before experimenting.
Common Mistakes to Avoid
❌ Leaving masks on too long – Can cause irritation and dryness
✅ Follow recommended timing – Set timer for accurate application periods
❌ Using metal bowls with acidic ingredients – Can cause chemical reactions
✅ Use glass or ceramic bowls – Prevents ingredient degradation
❌ Applying to eye area – Skin is too delicate for most ingredients
✅ Avoid eye and lip areas – Use specialized treatments for these zones
❌ Not patch testing – Can result in facial reactions
✅ Test on wrist first – Wait 24 hours before facial application
❌ Using expired ingredients – Reduces effectiveness and may cause irritation
✅ Check freshness dates – Use ingredients at peak potency
When to Consult a Professional
Seek dermatological advice if experiencing:
- Persistent redness or irritation
- Unusual breakouts after starting new routine
- Allergic reactions to natural ingredients
- Worsening of existing skin conditions
Storing and Preserving Your Natural Face Mask Ingredients 🏺
Fresh Ingredient Storage
Refrigeration Requirements:
- Avocados: Store whole until ready to use
- Yogurt: Keep sealed, use within expiration date
- Honey: Room temperature storage, indefinite shelf life
- Fresh fruits: Refrigerate and use within 3-5 days
Dry Ingredient Storage:
- Clay powders: Airtight containers, cool dry place
- Oats: Sealed containers, away from moisture
- Turmeric: Dark containers to prevent light degradation
- Coffee grounds: Freezer storage for extended freshness
Prepared Mask Storage
Most DIY Natural Face Masks for Glowing Skin should be used immediately for maximum effectiveness. However, some preparations can be stored:
Refrigerator Storage (1-3 days maximum):
- Clay-based masks without fresh ingredients
- Oatmeal-based preparations
- Honey-based masks
Freezer Storage (up to 1 month):
- Fruit-based masks in ice cube trays
- Portion-controlled servings for convenience
Never Store:
- Masks containing fresh dairy
- Preparations with raw eggs
- Masks with fresh citrus juice
Building Your DIY Skincare Toolkit 🧰
Essential Equipment
Basic Tools:
- Glass or ceramic mixing bowls (various sizes)
- Non-metal mixing spoons (wood or plastic)
- Measuring spoons and cups
- Fine mesh strainer
- Soft application brush
Advanced Tools:
- Small food processor for ingredient preparation
- Digital kitchen scale for precise measurements
- pH testing strips for formulation balance
- Small glass jars for storage
- Timer for accurate application timing
Budget-Friendly Shopping Tips
Bulk Buying: Purchase clay, oats, and honey in larger quantities for better value.
Multi-Purpose Ingredients: Choose items that work in multiple recipes (honey, yogurt, oats).
Seasonal Shopping: Buy fresh fruits when in season for better prices and quality.
Health Food Store Alternatives: Often better prices on natural ingredients than beauty stores.
Advanced Techniques for DIY Natural Face Masks for Glowing Skin 🔬
Layering Methods
Multi-Masking Approach:
- Apply clay mask to T-zone for oil control
- Use hydrating mask on cheeks for moisture
- Add cooling mask to under-eye area for puffiness
- Remove all simultaneously for balanced treatment
Ingredient Synergies
Powerful Combinations:
- Honey + Turmeric: Antimicrobial and brightening effects
- Avocado + Oats: Deep hydration with gentle exfoliation
- Clay + Apple Cider Vinegar: Enhanced purification and pH balance
- Yogurt + Cucumber: Cooling and probiotic benefits
Professional-Level Techniques
Temperature Therapy:
- Warm masks for enhanced penetration
- Cool masks for reducing inflammation
- Alternating temperatures for circulation boost
Massage Integration:
- Apply mask with gentle facial massage
- Promotes lymphatic drainage
- Enhances ingredient absorption
Conclusion: Your Journey to Radiant Skin Starts Today ✨
DIY Natural Face Masks for Glowing Skin represent more than just a beauty trend—they offer a sustainable, effective approach to skincare that honors both your skin’s needs and your budget. With over 10 proven recipes, customization strategies, and professional application techniques, this comprehensive guide provides everything needed to transform any kitchen into a personal spa sanctuary.
The journey to radiant skin doesn’t require expensive products or complicated routines. By harnessing the power of natural ingredients like honey, avocado, oats, and clay, anyone can achieve professional-quality results at home. The key lies in understanding individual skin needs, choosing appropriate ingredients, and maintaining consistency in application.
Your Next Steps:
- Start Simple: Choose 2-3 recipes that match your skin type and concerns
- Gather Ingredients: Stock up on versatile basics like honey, oats, and yogurt
- Create a Schedule: Plan mask treatments 1-2 times per week initially
- Track Results: Keep a simple journal of which masks work best
- Experiment Gradually: Add new ingredients and techniques as confidence grows
Remember, the most effective skincare routine is one that can be maintained consistently over time. DIY Natural Face Masks for Glowing Skin offer the perfect balance of efficacy, affordability, and enjoyment that makes healthy skincare habits sustainable for years to come.
Start tonight with a simple honey oat mask, and discover how natural ingredients can transform your skin from the inside out. Your future radiant self will thank you for taking this first step toward natural, glowing skin!